I LOVE talking about blocks, studying blocks, and playing with them in Photoshop... I am always on a quest for great blocks and trying to figure out what makes them so great ... So I started this companion blog that will be devoted to this quest. But also check out my regular blog at http://olderrose.blogspot.com

Thursday, June 30, 2011

Second Thoughts and maybe a second chance.

 Well sometimes I look at something I did after some time has elapsed and thing OMG "What was I thinking..?"  And that was what happened with this block when I was sorting and cleaning up my huge photo files...

I hate the short stubby dragonfly who looks like it has been overdosing on ice cream and is flying right OFF the block.... It is so heavy and clunky that it ruins the block...

I put the block in photoshop and played with it and then this morning I wrote to Ritva and asked if she could send the block back so I could fix it...
I'd like to extend the greenery more into that patch and add an elegant slim dragonfly that is flying in a direction that extends the circle shape... and maybe some pearls in the lace.   Since Ritva will soon be sending block along in the RR we are currently in I'm hoping she will send it.

Saturday, June 25, 2011

Do you see what I see!!!


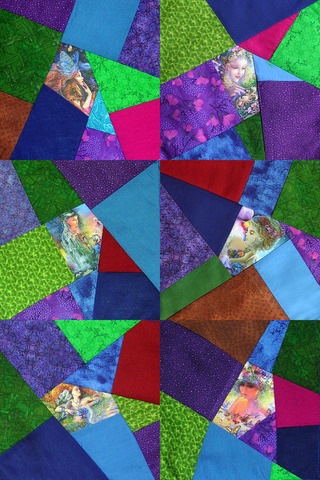
Now that I've gone on and on about focal points and framing I want to switch gears...  Overall balanced stitching is another approach  seen in CQ blocks.  The needlework actually works like a texture on the block as a whole..  This is such a block.. Your eye is not drawn to any one area and all the seam stitching is similar in size, pattern and color.

This block goes back several years in the CQNovice group and belonged to Susan...  It was worked on by Emmy, Ruthie, Cathy and Beryl.
There are a lot of fun details going on in this block and I want to be sure you see them all... many have to do with seam treatments or NO seam treatments

1. The first is my favorite... it's this motif that goes across two patches and creates a bridge  that carries your eye right across the patch... probably the most important element on the block... (If it were my block coming home I would add a little something above the pink patch to balance the seam treatment above the green patch)

2.This little spray of flowers again envelopes the seam and fills the area and brings your eye to the little bridge.

3.  Wisely the stitchers chose to ignore the two busy patches with the yellow daisies and anything that would make an impact on them would be too much...  If they were to have anything done it should   be very simple like beads in center of the  daisies...  But the lower right patch is another story.  Even though it is a busy fabric, its blooms are large enough and close enough to create  a background for the butterfly.

 4. The seam treatment on these two seams are different but very similar and it's carried over into the block.. simple, delicate, effective and works great with the butterfly.

5. The butterflies are very close in size and spaced nicely around the block...  The overall stitching on the blue patch is very similar in shape, color and size of the butterflies..  It is a very subtle and elegant addition.

Finally this brings me to one of my favorite subjects... treatments of worrisome little corner patches and this one is so clever..  Something on the seams would have emphasized how small it is... but by adding the visual "faux" seam with a stem stitch the patch is extended... If you keep a scrapbook of techniques, you should definitely include this one and I certainly am...

All in all this is a great block and an example of exemplary teamwork.  EVERYONE paid attention to the block and also paid attention to  each other's additions.

Wednesday, June 22, 2011

Suffragette Images

As work on this  project  it bridges the focus of  both my blogs (http://olderrose.blogspot.com) so I will run it on each:

I have been collecting suffragette images for about 10 years.  I began when I was making  suffragette art dolls and so I have several hundred items to choose from... When I started this quilt I began to narrow down my choices to nine blocks...and only 2 images to a block...and it was not easy.  I made some last minute changes yesterday..  All need photo editing to even out sepia tones and sharpen...

The two images on the left will be in the center block .  They have been my first choice for some time.  I can lighten the face on the young women voting.  I will print them all on paper first and experiment with size and placement.

Block 4 is center left on the quilt and these are the my choices for that block


It's on block 9 (lower right on quilt) that I changed my image choices completely... Last winter our museum had an exhibit celebrating the centennial of women's rights to vote in Washington State...  Part of that exhibit was devoted to the importance of the bicycles to this movement.  I originally planned to include some bicycle imagery on each block but now decided to devote an entire block to  the bicycle. 

For fascinating reading on this subject go to Women on Wheels: The Bicycle and the Women’s Movement of the 1890s

And a book that I found invaluable is Wheels of Change: How women rode the bicycle to freedom by Sue Macy.  This is a National Geographic book that I  love and would be a perfect gift for a teen or preteen girl. If you have a daughter, granddaughter or niece of this age I highly recommend it and they will look at their bikes differently for the rest of their life.

Now that I've made my final choices I will start editing the images...  Each block will also include one or more of the following...poster, banner, placard etc..   I had two many images on my AAQ entry but I was trying to tell the whole story on 1 block... so it will be easier with nine blocks..

I have had my goals for the images pretty clearly defined.... I wanted to include groups of women, proud women, happy women, determined women,  and strong women..

Saturday, June 18, 2011

Hair today and a little more.....

 It is often said certain hair styles "frame" the face...  Well here is an example of hair not only framing the face but hiding all the rough edges of an image printed on silk...  This is in its rough cut state before applying it to a block...
 Not only does using the hair frame the face it   is also used to integrate the image with the block.  Of course the headdress completes the frame.
 This is one of my all-time favorite blocks and was the inspiration for my block above.  This was done by Debbie Q. and she was first in the rotation and started the "hair" thing which we all followed.  So you have two things going on here...  The white patch is acting as a frame for the face as well as the hair...
 Here is a close up of that absolutely fabulous, incredible hair treatment.  I could have added a few more superlatives but I think you get the idea I loved it...


These are two more in that same series and were done using the same face which Diane provided.. The one on the left was done by Nicki Lee and the one on the right by Rose Anne.  If you follow along with me at all you will hear me talk about teamwork and working in harmony in RRs and here's a perfect example...  They had the same face to work with and both chose different but compatible treatments... not exactly hair but a headdress instead.
 
Here's another  example of beautifully framing the face with both hair and headdress.  This stunning work was done by Leslie
This is  an alternative that might not at first be considered framing...  The face of this Jack-in-the-box is indeed framed by his hat and his ruffled collar.


But look what happens when you enlarge the frame and having him juggling stars.....

So what is the purpose of all this talk about "framing"???  Well if you put a motif or something special on your block and want it to be the focal point then think about ways to frame it...to make it stand out.  It can be as simple as a regular frame, subtle as a simple circle, or even hair or stars. And if you might have trouble doing it on your work, start by looking for it on work by others...  Does something stand out and catch your eye?  Could it be because of a frame?  Maybe so!

I will post more examples as I run across them...

Next I will post a few before and after of great blocks  along with some blocks going out.....

Friday, June 17, 2011

Utilizing the shape of the patch to frame...


Using the shape of the patch to frame or define  a focal point is a good technique and here is an excellent example.  The needlework is done by Gayle S.  By using a simple geometric seam treatment on the white block she completed the frame with it and the branch for her cardinal..  This little corner of the block stands alone.....

But even on the block as a whole it is dramatic and everyone who followed her did a wonderful job... If I could alter anything it would be the button cluster which could be larger and carry across like northern lights.. maybe with some rhinestones and more silver.  If it were my block coming home to me I would definitely add more buttons... I often add and change A LOT on blocks after they come home... more later on that subject.
This needlework is by Janet P. and the little vignette is defined on one side by the shape of the block while the lace and button trail  framed the other two sides and just like Alice's work the other day, it wanders out and enhances the block as a whole...  So the message here is that you often don't need to completely surround something with needlework for it to be framed....
Sometimes as I'm gathering examples I have trouble identifying either the stitcher or the owner... I know this is Sherry's block but not sure who did the stitching..  (if you know, write me so I can give credit)   The image is framed by lace, embroidery, and ruching but the whole thing is defined by the shape of the block.. It is truly lovely and CQ at its finest.
Finally  it is the shape of the patch that frames and defines this little scene I did on Lindy's block in a spider RR even though the sign and flowers extend into the rest of the block... I created the scene to fit the patch..

I have accumulated a wealth of gorgeous work to share on this blog so if I have contacted you for permission and you have not seen it yet.... I am working as fast as I can and keep checking...

Also don't forget to become a follower as it is nice for me to know whom I'm working for... of course comments are always welcomed... AND I also hope you are oooohing and ahhhhing along with me.

And next on framing....."Hair Today"

Wednesday, June 15, 2011

More Framing Options

 On the left is how the image on one of my blocks left home with a simple lace and cording treatment...  But Jo N. ran a climbing rose up one side and pearls down the other... The contrast between the two added more interest to this frame..  Also notice the satin cording around the inside of the frame...  It is just super for securing images and looks pretty also... I bought yards and yards of this cording in all colors in CT.


This little vignette was on Lindy's block in a spider RR and was stitched by Marya.  She also used cording in addition to the glass leaves to make a delightful frame for the kitty and the spider... By "framing" this little scene your eye goes right to the action... I love little vignettes, scenes, stories and use them a LOT...

This clever composite frame actually captures the spirit of this wild child.... It was stitched by Laurie B.who must have looked like that child when she was little... This is a GREAT button trail..  It's a wonderful combination of beads, charms, and buttons of all kinds. sizes and colors.  The blue and lavender buttons echo the color in the silkie... The button trail also varies in directions and width with the heaviest portion anchoring the lower left corner... If the buttons had gone all the way around the image they would have overwhelmed it... The lighter stitching on the other two sides is a nice contrast..
And there's that word again.... contrast.

This is my work in a really old Roses RR and I included it because I wanted you to notice all the beading around the inside of the frame...  It does look pretty but its main purpose is to really secure the silkie in place and anchor it..

So framing is far more than just a box around something..  It should be in harmony with what it frames and also add interest to the block.

The next post will include the patch as part of the "frame."

Tuesday, June 14, 2011

Frames and Project Rescue

Opposite from opulent and encrusted is this delicate light approach to framing an image..  This is quite recent and is by Alice T. for Aida.  Especially notice how the fly stitches and beads integrate the image right out into the block.. The defined edges of the image are softened...  I'm partial to any treatment (like this one and like Pam's in the previous post) that merges an image into the block itself..

And a tiny thing that pleased me... Alice used the beads in chain stitch around the image but look closely at the upper right...  She echoed that by using knots in chain stitches on the seam... Those little echos whether technique, color, shape, etc. help bring a block together...  Thank you Alice.

Now an explanation on what blocks I'm using and why...  For the most part at the beginning of this new blog I'll be using images from older RRs...  Not that they are any better than current work being done but because they are being lost.  The sheer number of ongoing RRs and the limited storage available on Yahoo dictates the older RR files disappear..  So I am trying to rescue examples of my favorite stitching  before it is gone and also add newer stitching besides...  Likewise I'll use a lot of my own work on RRs just because I still have all the photos easily accessible on my computer...   I spend a good deal of time searching in vain  for some of my favorite blocks.  So bear with me and thanks to all who have generously allowed me to "block talk" about their work....

Sunday, June 12, 2011

Framing Options - noun or verb???


–noun 
 a border or case  enclosing a picture,  etc.
 
  –verb 
 to form or make, as by fitting and uniting parts together .
 
I have been following Pam Kellogg's progress with her Marie Antoinette quilt for some months.. She has all her blocks done now and they are just dripping with elegance and opulence. And that is just how she chose to enclose or "frame" all her pictures of Marie Antoinette. 
 
Any conventional frame would have been completely out of character with the theme of the project... You will notice that her treatment fits the verb definition of the word "frame".... fitting and uniting parts together.  With the colors in the gowns as her guide Pam has used bits and pieces to completely enclose the images.  Over the next few posts I will be sharing lots of options for "framing"..especially frames that suit the block or image. 
 
To see all nine of the blocks go to Pam's blog....   She is just now getting ready to piece it together and I for one don't want to miss that....   Pam  is planning to start classes at her home and I was going to tell you about them but I couldn't make them sound as nearly as inviting as Pam does....
 
According to Pam: " The thing about my classes that I would like people to know is that it will be a lovely ladies day.  I'm planning on healthy homemade lunches and my homemade cookies and muffins.  Our home is a cottage in a very woodsy, area near a lake.  It's warm and cozy here, very comforting and charming.  I would just like people to know that my classes will be small, personable and will have an old fashioned comfort to them.  Like a quilting bee! 

Doesn't sound like just the perfect way to spend a day.... with lovely ladies... 


Friday, June 10, 2011

Sunday, June 5, 2011

Hats off to Gayle

You have to see Gayle's inspiration piece to see how clever her design solutions are on this Artist RR piece sent out by Margreet in the Netherlands.

The subject is the Dutch artist Piet Mondrian,  known for his abstract use of primary colors and black lines. Margreet limited the colors used to the three primary colors and black and white.... no greens.. Gayle then did some research. The musical symbols are obvious but I want you to notice what is NOT so obvious...


 She chose this painting by Piet Mondrian, Broadway Boogie-Woogie   It was completed in 1943 after he moved to Manhattan.  Compared to his earlier work, the canvas is divided into a much larger number of squares and a departure from his black grid. This painting is inspired by  the city grid of Manhattan, and the  boogie-woogie music  Mondrian loved . 

The painting looks to me like one of those electronic grids tracking traffic movement..


And that is what it must have looked like to Gayle as you can see an aerial photo of traffic on the left and her choice of unique seams on the right.  She not only captured the feel of the traffic she captured the energy of it... Now is that clever or WHAT????

Hats off to Gayle on this one!!!!


The painting is still in New York at the Museum of Modern Art. 

Friday, June 3, 2011

Embroidery on Prints

This block is by Ritva in Finland..   Her work is always exquisite and delicate. Reminds me a lot of Maire Courtney's who has not been active for very long time and I miss her.

But in a recent post I showed how Cathy K. used ribbons and beads to turn a print into a motif and here is another example by Ritva who did it with just stitches.. simple and elegant solution. 

And speaking of Cathy K. you might want to pop over to her blog as she posted about a busy print block she is just finishing.  This subject has come up often.

My brain has been buzzing with ideas for Margreet's blocks which I hope to be in today's mail when I go to town.... I'm ready for an attack of "whimsy."

Thursday, June 2, 2011

Question from Berta - UTS blocks

My question is - Is there a better way to piece a UTS block than the normal one?  I've been looking at blocks and all the embellishment seems to go up and down.  And I wondered if seams should take notice of this.  Have a  first for me UTS RR coming up and thought I'd ask.  Berta

What a great question and I have a long answer for you..  First I have never been in a UTS RR for two reasons... not my favorite colors and there is always a sameness about them...  It's like you are looking into an aquarium with the sand on the bottom and sea plants going up, a sunken treasure chest and a mermaid..
Since the water in the sea actually is in horizontal layers dictated by temperature and currents I see no reason for the seams to be vertical..  You can certainly add vertical needlework without regard for seams...in fact it adds more interest.

You didn't say if it were a traditional or DYB RR but either way if it were me I'd start doing some research and probably focus on one species or scene...  Maybe a huge grouper peering out from a rock cave and watching his prey or a large school of jellyfish presents all sorts of possibilities with beads, ribbons etc. I think a whole block of multicolored jellyfish has exciting possibilities... Try to think of doing something different and I will be watching..

Now having said that I did have to do just one traditional UTS block in an RR in which I was angel...  When the block arrived to me the obligatory treasure chest had already been added..  But I was thinking currents and looking down from above and  wanted a circular motion...  I began thinking "sea life on parade" and added the large beaded fish, the school of little fishes, the family of turtles and the dolphins on the wavy seam. (an of course the button)

Thanks for asking your question and remember.... DO SOMETHING DIFFERENT!!!!!

Wednesday, June 1, 2011

What's so risky about bold prints!!!!!

(I was in error when I posted this not to mention it was constructed by Lorrie Ramsey) This is a gorgeous block...  The colors are all coordinated and the prints are all seem to fit a theme...  It is bold, brash, and bright... It is a block that says "I can stand alone" and "I can speak for myself." and therein lies the problem..  It would be stunning on a traditional quilt but  in my opinion it will be overpowering for CQ...


Remember the lovely sunflower work by Rita a couple posts ago?  The sunflowers and all her seams are swallowed up by this block.
 
The same happened with  Colleen's work on this same block.
Well I was rooming with Cathy K. in CT when she was working on her block in this series.  Cathy is a "master block modifier" and here is how she handled this block...  First she laid a piece of green lace over the print in the lower left corner which made it disappear...  Then she had to find something bolder than the block and found this crocheted red flower and with some leaves made the plaid area disappear....added the large sun to balance out the flower..both with button centers.  Now the block is a field of greens..
Her next area was the print where she used silk ribbons and beads to make it into a motif rather than a fabric print... Remember this technique as it can really be useful.... Here is a close up of it...
Cathy's work is not swallowed by the prints on the original but she had to do a lot of modifying to make it work....  Wouldn't it be easier (and kinder to the stitchers) to save those bold brash prints for traditional  quilts? 

There is just one thing on Cathy's work I would change.  I know she meant the buttons below the big bold red flower to be little flowers...  But I thought they looked liked buttons who ran away and got lost...  so I moved them back up with the other buttons and added a few beads.... 

So in closing I am going to repeat what I said about blocks you send out to stitchers in RRs

What you send is actually the canvas for their art, the stage for their creativity and the backdrop for all their time and effort...
You are certainly welcome to agree or disagree with me on this issue as I'm only voicing my opinion... If you are someone who likes working on bold bright prints now's your chance to speak up!

Comments on Vivenne's latest block....

 Vivienne invited comments and you know I always have an opinion and what an elegant block to discuss.  She herself commented that someone asked her if it was a communion block and I can see why...  the angel is such a dominant feature.  After reading your blog I get the impression that you intended the focus to be on the bounty of your valley.  So with the magic of photoshop I do have a suggestion or two.

So if the focus  on the bounty of your valley  is the case I think you need a much LARGER sun to be the focus rather than the angel.. and definitely one more butterfly!!  The fine line gold thread on the spider and around the sun is a lovely accent and would be worth extending into the upper right..

I don't think you should really want your style to stay the same....it should always be growing and expanding..   The more things you experiment with will add depth and complexity to your  antique Victorian/Edwardian romantic work.. 

And for heaven's sake where are the chocolates????  It really a gorgeous block and kudos to you for attracting attention on your train...  Make up little cards with websites about CQ and pass them out to folks who show an interest.

AND read the comments as Cathy K. has a great tip for sewing on charms...

Blocks leaving home...

When you join a round robin you will be sending blocks to your other RR members...  These are like invitations to them to do their best work for you... What you send is actually the canvas for their art, the stage for their creativity and the backdrop for all their time and effort...

I spent some time in the archives and chose of variety of blocks and types of construction.This block by Aida would be perfect for any crazy quilting.. It is typical construction with a 5 sided center. 


This block was done by Jody and a good example of how the color and mood can be set by the block itself..  There plenty of contrast in texture, fabric, color on this block.
Beryl's block is almost all prints but they are subtle and tone on tone so every patch would make a good backdrop for stitching.


This set of blocks by Misty is intensely colorful and almost all prints again...but prints that can show off any stitching done.  DMC has a set of "neon" threads that I bought to use on a block of Laurie Bs and they would work well with this block..  Strong color blocks needs strong colors of thread.


I believe this block was by Alice and shows a different approach to patching... Later I will show this block finished.
This was pieced to the Fans RR several years ago by Leslie E. Again it has prints that are soft and workable.. It also has a wide variety of fabrics.. including silks, satins, velvets and brocades.


Laurie B made this block for the Spider RR and it is all fancies that are either patterned or textured.  She wanted a fanciful garden and set the stage herself with the swing. Often the block creator puts lace, silkies or other elements on the blocks before they leave.
Finally here is a block by Gerry H whose blocks are masterpieces when they leave home.  She provides the very best blocks to work on.  Again I will later show this one already finished....

Do you see a point I'm making.. Blocks can be all colors, all kinds of fabrics, all kinds of patches, all kinds of textures, and all kinds of patterns but they all have to still provide the stage, the canvas, the backdrop for the efforts of the stitchers who will be doing their best for you... When you make your fabric choices this should be foremost in your mind...