I LOVE talking about blocks, studying blocks, and playing with them in Photoshop... I am always on a quest for great blocks and trying to figure out what makes them so great ... So I started this companion blog that will be devoted to this quest. But also check out my regular blog at http://olderrose.blogspot.com

Showing posts with label problem. Show all posts

Monday, January 16, 2012

Embellishi​ng busy blocks

An email from Lauri Nuske this morning:

"Hi Gerry,
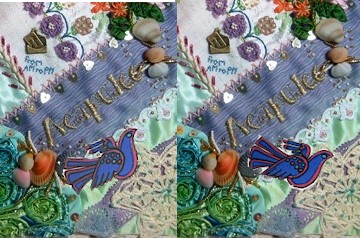
I participate in rr's and dyb's and have fun embellishing the different blocks. Most blocks I send out are solids or light patterned.  So when I get a block that is heavy patterned, like lots of flowers and calicos and dark prints, I get stumped as to what to add that won't get lost in the print.  Any suggestions?"


Well Laurie this is always a problem for me also...  We all want to do our best and have it show... but as you say it is difficult, if not impossible, on busy blocks...

First you have to be bold and willing to modify the block.. Consider using all-over stitching or  large clusters such as Cathy L. used here.  If it doesn't have a silkie, add a large one...  If it does have a silkie,  embellish a 2" frame around it to make it the focal point and draw attention away from busy prints. Look for laces to cover areas, large motifs, very wide ribbons and even patches of fabric. I covered an entire patch on a block last fall. Tulle or organza can soften difficult areas nicely.  

Sharon B. incorporates some large busy prints in her work but balances it with large dramatic buttons, dense floral clusters, and heavy and/or textured threads.

Everything you use or do will have to make a statement stronger than the prints.  The next time you get such a block send me a picture of it and I will see if I can give you some ideas...

But personally I find a whole block of busy prints extremely discouraging and it makes my work much less enjoyable..   Last spring I did two posts on this very subject and how Cathy K. and Janet P. handled busy blocks head on.

http://blocktalkwithgerry.blogspot.com/2011/06/whats-so-risky-about-bold-prints.html


http://blocktalkwithgerry.blogspot.com/2011/05/i-happened-across-work-janet-in.html

Note: My life is finally settling and in a week or two things should be back to normal...  I missed doing this blog and noticed several emails for it.  I will catch up as I can..  Stay tuned.

Wednesday, December 7, 2011

Response to comment!

Yesterday I received a comment that I am more than happy to respond to.....  "I have noticed in the past that you and many others talk about how elements should lead the eye around a block.....  But in this block you have placed the blue bird which is a fairly strong element flying right on out of the picture .... would you mind commenting on that please?"

Well when I placed this bird my eye was following the contour and the thrust of the bird which is upward.....not outward..


 In fact in my eye every element of this bird goes up ...not out.!!!


And so to me it was completing the path in the block.


To be flying right out of the block the bird needed to be tipped forward for the contour to aim it in that direction.   Note that the most important directional element of the bird is along the back...When placed side by side I hope you can see the difference... Of course Angela could tip the bird even further upward or place it closer to the rocks......

I am happy to answer questions at any time...

Sunday, November 13, 2011

A little problem with scale......

While at the CO retreat I mentioned I wished I had joined the "For the Birds" RR when it came up as all the blocks were just great...  Connie just happened to have her last block available   and while I was working on it, Janet just happened to have her last block available... So I worked on Connie's and took Janet's home and it was the perfect size for something to work on in the plane to Wichita... I did the focal area around the bird going and all the seam work coming home...  I wanted the color to be concentrated around the bird which is the focal area...and that is why all the seam work is green...  I did stitch around the bird, then made a slit in the back and stuffed him a little to make him plump. Then I added a nice quiet little spider web near the center.

Last I wanted to add just a little more pink upper right to balance out the pink in the bottom patch and the pink flower...so I added a little lace dragonfly... and therein lies the problem of scale...  It is much too large.. almost as large as the bird and detracts from the bird.  The pink flower, the dragonfly and the bird are all about the same size and my eye hops from one to the other... When that happens the best thing is to make something smaller or bigger...  In this case the bird and the flower were predetermined by the block so it was only the dragonfly which could be changed.

I should have hand stitched a dragonfly and you can see the difference that would have made in the center photo...the bird again is the main focus. It  would even look better with no dragonfly rather than with the larger dragonfly on the left.... There is a point to this post and it has taken me a while to get to it...  Sometimes when you are not satisfied with a block it's not easy to identify why... Trust where your eye travels and why!  Often it is some small thing that makes a huge difference..and it is easy to change the wrong thing...  And most of the time if you don't change it, it is not long before you forget what bothered you.... so relax and enjoy!!!!!   On that note the  important dragonfly decision is going to be left to Janet.

..

Here are the before and after shots of the block....and as you can see I chose to extend the image out into the block....  Now next on my UFO list is Kerry's beaded block and it will be a block makeover to show you...I have just one corner to do on it but since it is beaded I have to work on it at home...  Then Ritva's and I will be caught up and can think about setting up the RRs...